
Saturday, August 23, 2014
Using left over ends of yarn
Crocodile scarf


Leftover yarn

Owl socks


Leafy Sweater


Brain Cap


Christmas gifts - 2013

Purse/Bag


Felted bag with scrap fabrics


Saturday, October 5, 2013
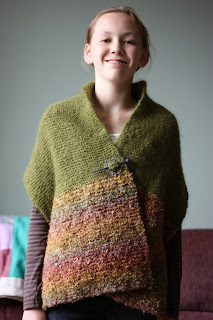
A simple design that took forever...
It didn't take forever because of the work involved in this project. Other commitments took over and this sat on the back burner for almost a year. I didn't have a pattern but was inspired my something I came across - a knitted Japanese shawl of some kind. I thought I had enough of the wool when I started and realized that I would surely run out so, I bought something complimentary for the middle.
It's a 4-in-1 project (scarf, long-sleeved cowl, shawl & poncho).
It's just a long rectangle with 4 buttons with 4 corresponding button holes on each end....but no buttons or button holes in the middle (a width of your shoulders).


It's a 4-in-1 project (scarf, long-sleeved cowl, shawl & poncho).
It's just a long rectangle with 4 buttons with 4 corresponding button holes on each end....but no buttons or button holes in the middle (a width of your shoulders).


Sunday, December 30, 2012
My first (trial) 2-at-a-time toe up socks


Monday, September 3, 2012

Friday, July 27, 2012
If only...
 |
| Hooked rug with Maya and Joanne (friend) as part of a cod moratorium art exhibit at Five Island Art Gallery. |


Fortune Placemats
 |
| I made these for a Christmas exchange gift. |
 |
| Each place mat has 16 possible "fortunes" to pick from at the end of their meal. You pick a slot and pull out (attached by elastic) a fortune. |
 |
| With matching napkins. |
 |
| Double-sided, dark versus light pending tableware. |


Wednesday, March 14, 2012
Double-sided napkins
I was telling my friend on day that I was planning to make napkins and serge the edge. She convinced me (very quickly) that I should try making double-sided (and more substantial) napkins. I put 'fortunes' on each side of every napkin. This was for my cousin who is getting married this month (missing the wedding - in Ontario).

Friday, July 8, 2011
Ode to Newfoundland

This is a hooked rug that was made with Maya for a show in conjunction with Festival 500 (an international choral festival in St. John's every other year). It depicts a coastal scene that is inspired by the Newfoundland Anthem called "the Ode to Newfoundland". You'll see that there is an abstract figure running through the horizontal middle that follows the melody line of the anthem...with harmony lines coming off of it (in different colours representing the different choirs/voices, culturally representation at the festival, etc.).
Monday, March 28, 2011
Maya and her new red coat

Maya has almost grown out of the last 2/3 or 3/4 coat I made her so she requested a red coat with a faux fur trim...it's still rather big. It'll probably be something she'll wear more next year.
Wednesday, November 3, 2010
Monday, October 4, 2010
Re-inventing a belt

Friday, May 7, 2010
Cosmosaic
Maya and submitted a hooked rug for a gallery exhibit entitled "Hooking Our Heritage" (soon to be posted on http://www.fiveisland.ca/index.php). Scott is our link to the Irish heritage theme...and so we opted to do something that captures our family's collective heritage. The concept was actually inspired by Scott (as he kindly reminded me this week) - and the rug is divided into four quadrants: Innu tent in Labrador, downtown Tokyo, Mennonite farm country in southern Ontario and Irish countryside (all shown respectively below).


 Scott and Maya.
 Joanne and Maya.
 Myself and Mom.
 Maya.
Maya.
 Mom/Grandma and Maya.


 Scott and Maya.
 Joanne and Maya.
 Myself and Mom.
 Maya.
Maya. Mom/Grandma and Maya.
Subscribe to:
Posts (Atom)